
Last Updated on 5 years by On Trends Gear
Screenshot Record On iPhone or screen recording is a feature that allows you to capture the recording of an iPhone, iPad, or iPod Touch while it’s in use.
Every Apple mobile device, be it an iPhone, IPad or iPod Touch comes with a built-in iOS Screen Recording feature that allows you to capture recordings and save or share video files.
If you’re a Vlogger and you deal with video tutorials on iOS, this would help you create better videos in the sense that your viewers will be able to see you take the steps and know the outcomes of those steps.
To enable Screen Recording on your iOS device, you would have to enable several settings on your device.
The steps to doing so are very easy and in no time you should be able to record the screen of an iPhone, iPad or iPod Touch.
Table of Contents
Procedure to Screenshot Record On iPhone
Note: This feature is only available to those with a modern version of iOS. This means you can only enable the Screen recording features on your iPhone, iPad or iPod Touch if you have iOS 11 or later installed on your device.
These modern versions support the screen recording feature natively, however, older versions would allow for some screen recording options and you will find how to Screenshot Record On iPhone in this article.
To enable screen recording on iPhone or iPad or iPod Touch with iOS 11 or later, you will have to.
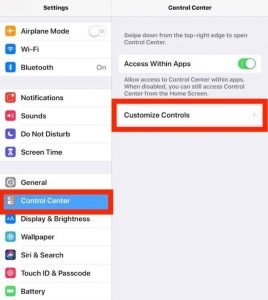
Go to your iPhone menu and click on the Settings app.
Next, navigate to “Control Center” and then “Customize Controls”
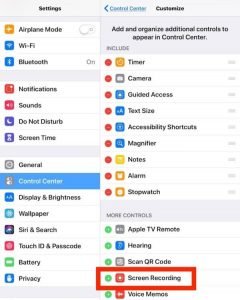
On this page, you will find a lot of apps that you can customize and adjust to your taste. To set up screen recording, you will have to scroll to the button and tap on “Screen Recording”
Tap on the green (+) button to include the screen recorder in Control Center.
With that, you’ve enabled a screen recorder in your iOS device and you can go ahead to use the feature.
How To Use Screen Recording on iPhone, iPad, and iPod

Now tap the screen recorder button while it’s in Control Center. (If you’re using an iPhone or iPad without a Home button swipe down from the top-right of the screen, instead, swipe up from the button of the screen on any iOS device with a Home button).
There will be a three-second countdown before you start recording
Note: if you’re using an iPhone or iPad, need to avoid iPhone Accessories Not Supported you’ll have to turn on your Microphone while recording.
To do so, long press the Screen Record button while in Control Center. From here, you can use your iOS device to do what you want to be recorded.

Once you’re done recording, click on the red button at the top of the screen. Or you can return to the control centre and click on the stop recording button.

When done, you will receive a notification that the screen recording has been captured and your video has been saved successfully.
You can check out the screen recording video in the Photos folder of your iPhone.
iPhone, iPad, and iPod Touch Screen Recording Tips
Below are some additional helpful tips that will help you to make better screen recordings on your iOS device.
For better and clutter-free screen capture, turn on the Do Not Disturb mode first on your iOS device. This will prevent notifications, calls, alerts, and messages from appearing on your device giving you all the freedom you need to make a neat recording.
The 3-second countdown aims to prepare you for your recording. Use this to your advantage by checking to make sure everything is in order.
After recording, you may need to trim, crop or make edits to the video. You can do it with any regular video editor on your iOS device. You can use the iOS Photos app to trim out unnecessary parts of the video or the iMovie app to add text caption, zoom or crop the video.
If you’d like to transfer or send the video to a Mac or PC to edit it or you want to upload it on your Youtube channel, you can do so with AirDrop or any app that allows the wireless transfer.
Additionally, your screen recordings can be uploaded as screencasts to a cloud server, to your own computer or to any social sharing site of choice.
How to Screenshot Record On iPhone with Mac and QuickTime

If you don’t own an iPhone or iPad with iOS 11 or later, you can record your iPhone or iPad screen with QuickTime, a video app on Mac computers.
To record your iOS device on Mac OS X With QuickTime, simply Connect your iOS device (iPhone/ iPad/iPod) to your Mac via a USB cable
Launch the QuickTime app on Mac OS X

When it launches, click on the File menu and then on New Movie Recording.

A video recording screen will pop up. Hover, the mouse over the active window to show the record and volume control. Click on the arrow beside the red record button. The camera and microphone options will pop up.
You will see your connected iOS device in the Camera and Microphone options. Tick the device in both options.
With that, the Movie Recording screen will move into the screen of your iOS device. Your home screen will also be displayed on the Mac screen. To record, click on the “red record button”
To stop recording, click on the red record button or on the Stop button in the upper right menu bar of your Mac.

To save the video, click on the File Menu and then choose “Save“
Your recorded video will be saved as a .mov video file on your Mac. You can edit, crop, trim or make any further edits to the video on QuickTime or via any other editing software like iMovie or Final Cut.
Wrapping Up Tips to Screenshot Record On iPhone
Those are the easy ways to screen record on your iPhone, iPad or iPod Touch. If you own an iOS device with iOS 11 or later installed in it, you won’t have to use a Mac for screen recording, though it could also work for your iOS device.
Discover more from On Trend Gear
Subscribe to get the latest posts sent to your email.